Why is photography backup important?
Photography backup is important because it ensures that your photos are safe and can be retrieved in case of loss or damage to the original files. This can include hardware failure, software corruption, or accidental deletion. Backing up your photos regularly can also protect them from being lost in case of natural disasters, theft, or other unforeseen events. Additionally, having multiple copies of your photos can allow you to access them from different devices or locations, and can serve as a form of archiving for historical or sentimental purposes.
Backup strategy
The 3-2-1 backup rule is a common approach that aims to give you maximum protection in any disaster. It ensures that your data is protected by having multiple copies in different locations. It involves creating three copies of your data, storing two of them locally, and keeping one copy off-site. This way, even if one copy of the data is lost or damaged, you still have two other copies that can be used to restore it. The three copies can be created by using different methods such as external hard drives, cloud storage, and USB drives. This strategy can be used to protect not only photography but any data that is important to you.
My backup solution
This is my photography backup solution for 2023:

NAS storage – For NAS storage I use Synology DS220+, 2 bay NAS, with two WD Red Pro 2TB NAS HDDs.
External HDD – For external HDD I use WD 2TB HDD. It was very cheap and good for the price.
Google Drive – Google Drive is my cloud backup solution, as an off-site backup solution. I usually upload my exported JPEG files there and print material.
Directory structure
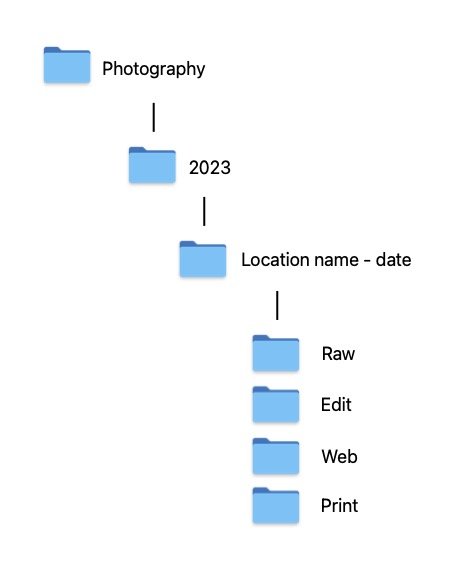
After getting back from the photography event I start my workflow by copying images from my camera into my computer. This is done from Lightroom, by moving photos Into a dedicated folder with the location name and date when I took them. At that moment I like to organize all metadata by a period of the year (summer, winter …), continent, location details like objects, or by something that describes that location more precisely. This is what my directory looks like on the disk:

Photography is the main directory where I put all my photos. Each year has a separate directory, and inside each year I organize my images based on the location and date when I took them.
Example:
Old mountain – 11/01/2023
Waterfall – 15/01/2023
Inside each of that directories, there are 4 directories that I create before any editing, and they are:
Raw – The place where I store all my raw files from my camera and my drone.
Edit – Lightroom export directory where I store all my edits.
Web – Lightroom export directory where I store photos for this website and all other web publications.
Print – Lightroom export directory where I store all my photos for printing.
File naming:
I usually name files by task and additional info about the watermark, which means:
<filename>_<directory>[_watermark].jpeg
Let me put that into practice
1) Edit: <filename>_edit.jpeg
2) Edit with watermark: <filename>_edit_watermark.jpeg
3) Web: <filename>_web.jpeg
4) Web with watermark: <filename>_web_watermark.jpeg
4) Print has <filename>_print.tiff
Basic backup terminology
Before I jump into my backup workflow, let me introduce some important keywords about this process. Because the wrong tool can be a disaster for your backup solution.
Syncing
Syncing is creating two identical copies that are updated both ways. If a file or change is detected on drive A, drive B is updated. If a file or change is detected on drive B, drive A is updated. If you delete a file, both are deleted. It is great if you make changes on both drives. For photography backup, this isn’t a good solution, because our images may be deleted if we remove that image from our local HDD, etc.
Mirroring
Creating two identical copies that are only updated one way. This is perfect for photography because we want our second drive to be the same bit for bit. If the main drive fails, we swap and use the mirrored drive until we rebuild a new one. There’s no downtime.
Copying
The standard way of doing a backup, selecting all files from one hard drive and copying them to the other. There is no link. If you change something on drive A, drive B never sees it.
My backup workflow
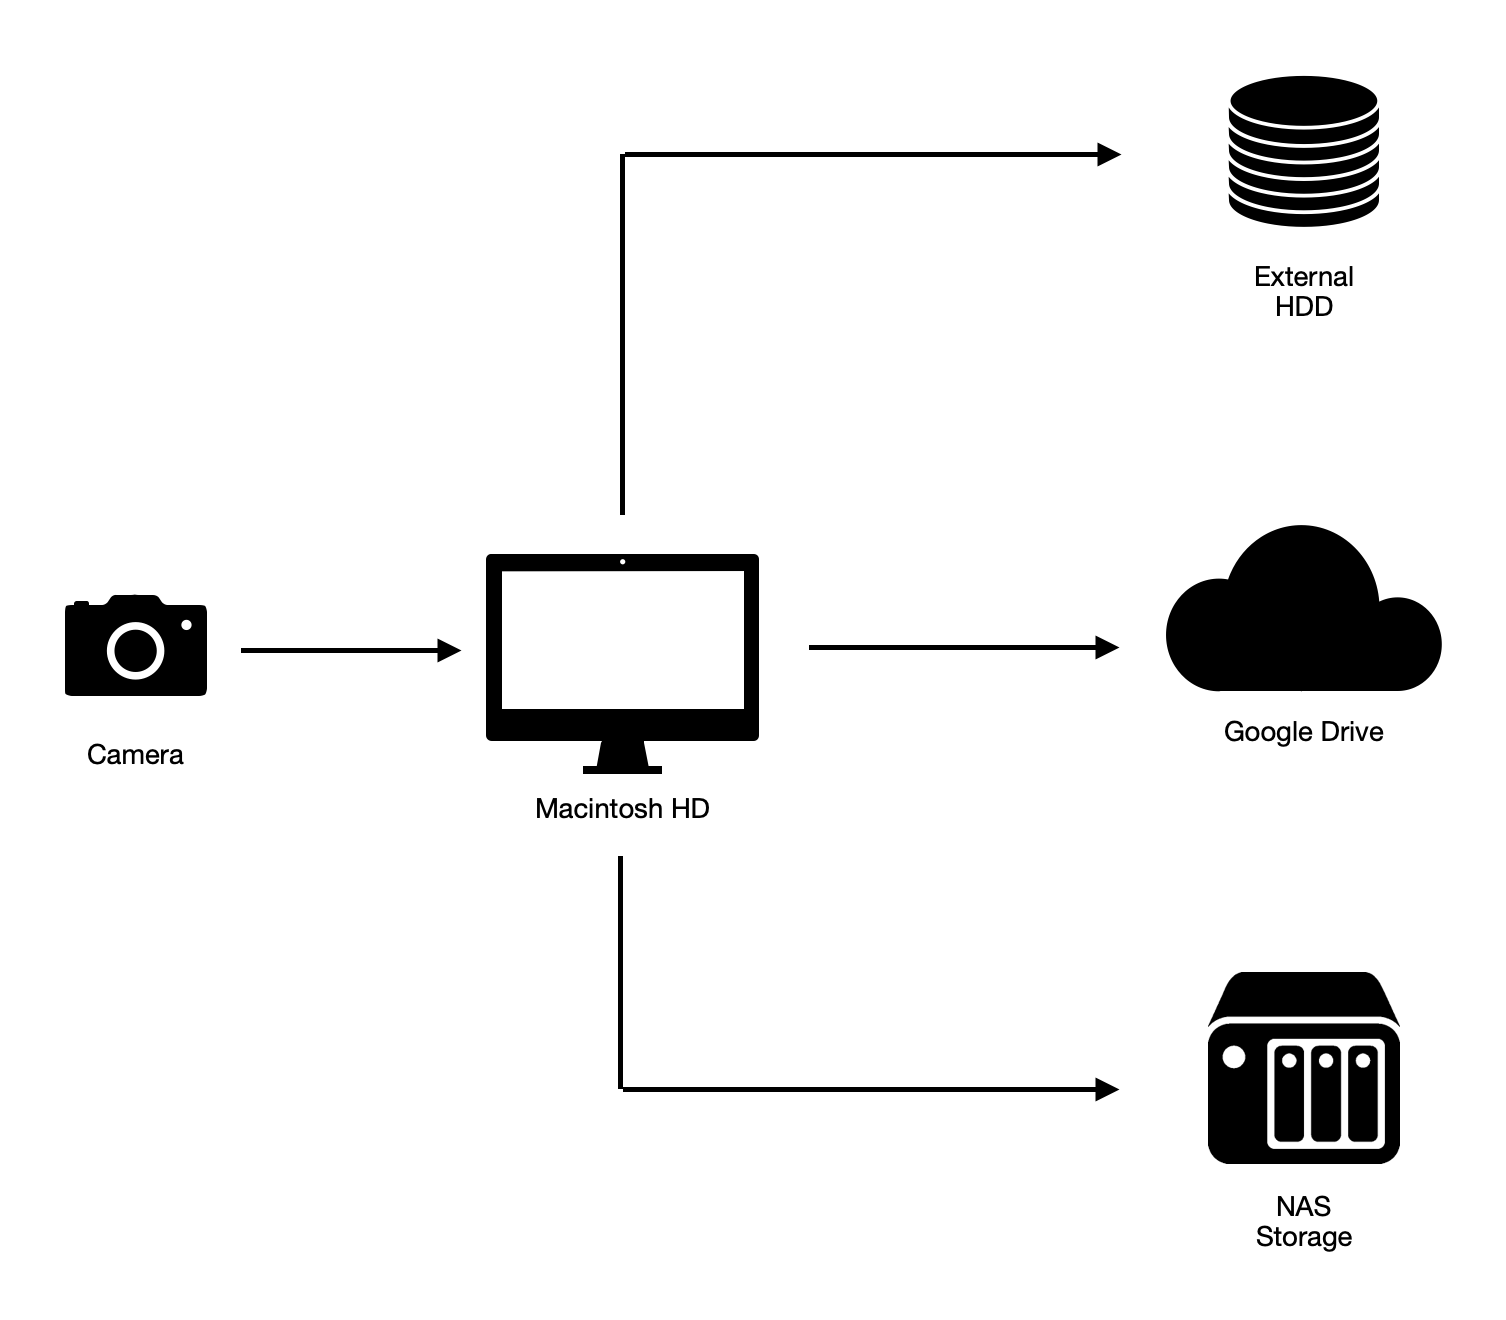
Manual backup is ok but too error-prone, so I like to automate things and enjoy drinking coffee beside my computer. There are so many free and paid solutions on the market that have these options but for me tool named Carbon Copy Cloner is enough. You can download it from here, unfortunately, it’s a MacOS solution only.
Mirroring my local HDD to NAS
I’ve configured Carbon Copy Cloner to mirror the whole Photography directory onto a NAS. Having that in mind I can freely delete images from my local machine. But there is one small catch, after removing the directory from the local machine I need to update the Lightroom catalog too because he lost the information about the directory where to look for images. I know that Lightroom can do this automatically for you by moving files from Lightroom, but for me, it’s very slow and I once lost images which is a big no-no.
Mirroring my local HDD to an external HDD
I’ve configured Carbon Copy Cloner to mirror the whole Photography directory onto my WD 2TB external HDD beside NAS. So what goes onto a NAS goes here too. In case I lost my photos on the NAS or my local machine, they are safe here.
Mirroring my local HDD to Google Drive
This time Carbon Copy Cloner is configured to mirror the Photography directory, with one specific configuration. I only backup there my exported files excluding the raw directory. In that way, I save some space on Google Drive and still have access to my edits for the web, social network, or even print.
Run out of storage solution?
When I run out of storage, my plan is to download everything from my google drive onto a new secondary external HDD and store that HDD with my backup HDD in some safe location where nothing can happen to them. Buy one external HDD, since they are very cheap and clean NAS storage for new images that are coming.
What do numbers say?
At the moment of writing this blog post, my NAS storage with two HDDs of 2TB has my 4-year photography history, alongside an external HDD and Google Drive. With 1TB space left which is ok.
If you ask yourself how is that possible, let me tell you one small “secret”. After many trials and errors, I have found out that I never edit my photos again after doing backup. So I try during the edit period to really squash everything from them! Many are deleted, some are saved as potentials or good ideas, but only the best ones are backed up with raw data. I come home usually with 200 shots per session and save only 10 to 20 after that. Depending on how good they are.
Want to buy stuff that I use?
Here are the links:

