Embarking on the quest for the perfect photo in my creative pursuits often led me to the intricate world of location scouting. A well-chosen location is pivotal in enhancing visual appeal and contributing to the overall storytelling experience. In this blog post, I share my personal journey of grappling with the complexities of location scouting and unveil how I’ve harnessed the power of Apple Shortcuts to streamline and revolutionize the process. These shortcuts, presented in the post, not only expedite the identification of potential locations but also simplify logistical aspects, providing a seamless solution to a once-demanding task.
Table of contents
Apple Shortcuts
Before we dive into the specific Apple Shortcuts for landscape photography scouting, let’s first understand what Apple Shortcuts are. These customizable, automated workflows allow you to simplify complex tasks on your iOS device. By combining various actions and app integrations, you can create shortcuts that significantly enhance your productivity and efficiency.

You can download the Shortcuts app from the Apple App Store if it’s not already installed on your device. Use this link to go to the App Store directly. Once you have the app, open it, and you’ll find a “Gallery” section. This is a great place to begin. The Gallery is a collection of pre-made shortcuts created by Apple and other users. It’s a valuable resource for discovering what’s possible with Shortcuts and getting inspiration.
Capturing data on location
Collecting data on location is all about being practical and precise because this data is very important for planning the perfect shots later. With GPS coordinates, we can pinpoint our favorite shooting spots and easily organize our photo location archive. The ephemeris data, including sun and moon azimuth and elevation, is like a secret timetable, helping us schedule our shoots during the best lighting conditions. With information about the weather data, we have better insight into the climate on location.
Be aware that location services must be enabled on the device, to get weather data, current GPS coordinates, and geotag photos.
Apple shortcut for capturing data in the field:

The result from capturing data on location looks like this:
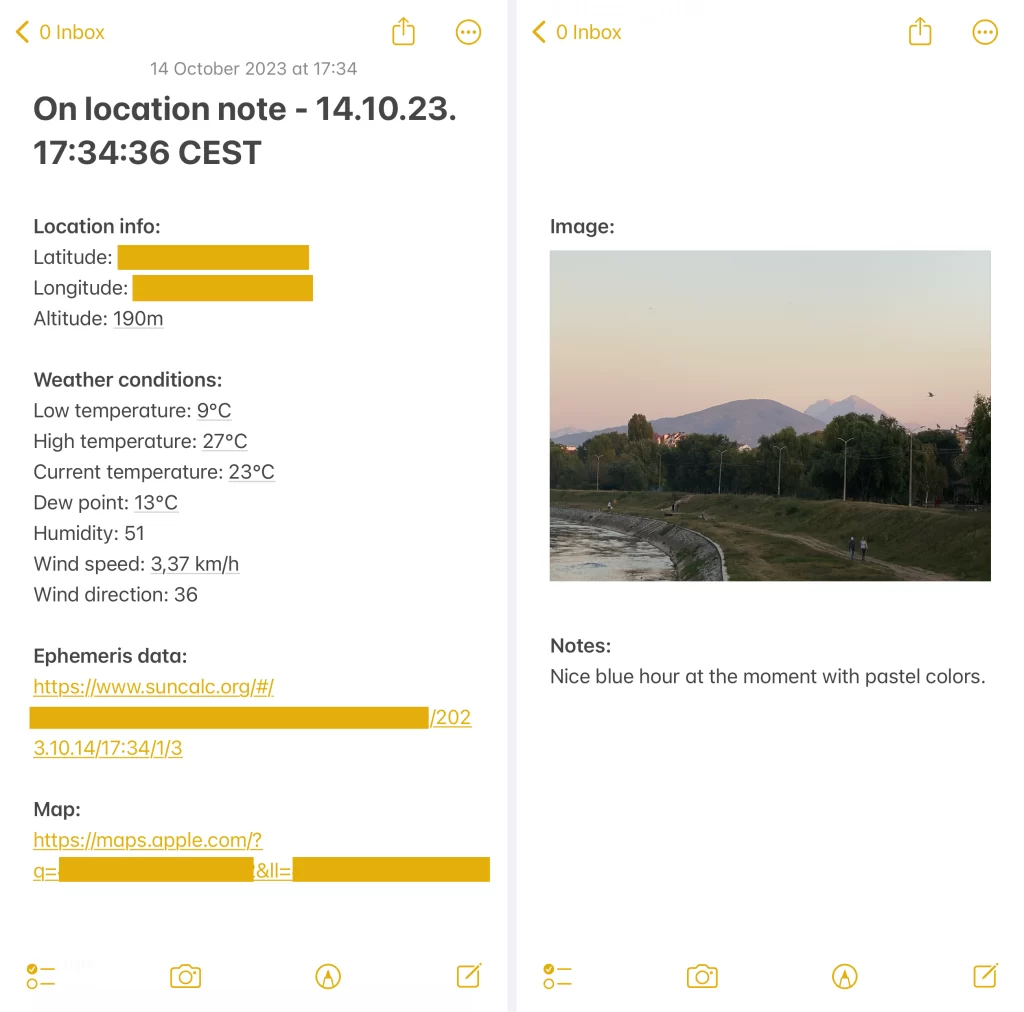
With this shortcut, on location, I will retrieve the current weather condition, including temperature, humidity, wind speed, and direction, dewpoint, link to the SunCalc webpage to visualize the sun’s path, MoonCalc webpage to visualize the moon’s path, Apple Maps URL, and add photo for further idea research. Finally, captured data will be stored in a note inside Apple Note, and captured photos will include in EXIF data information about the location where the image was taken.
After getting home from location scouting, I have detailed knowledge of the location and now the only “problem” is the weather forecast, in order to know when to get back and capture some stunning moments.
You can download this Apple Shortcut for free from here: link.
Capturing data at home
Sometimes it’s impossible to capture data directly on location, there is no internet, weather data is not precise or we need to save battery as much as possible. To solve that problem I have another shortcut that will read EXIF data from the phone image and gather data from the internet. This shortcut is slightly complex because it involves using two utility shortcuts because the blocks that Apple Shortcuts contains do not provide weather data for our location at a specific time point in history.
The first utility script downloads and processes Open-Meteo weather data for our location, and the second executes small JavaScript code. These utility shortcuts and a shortcut that will capture data from captured photos can be downloaded for free from here:
GetOpenMeteoData
EvaluateJS
ExtractFieldNote.
Apple Shortcut for extracting field data at home
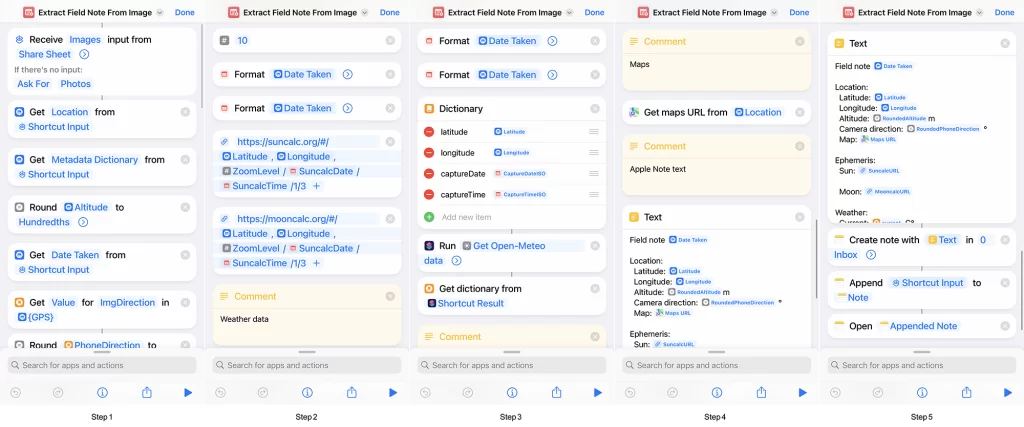
The result of extracting data from photos at home looks like this:
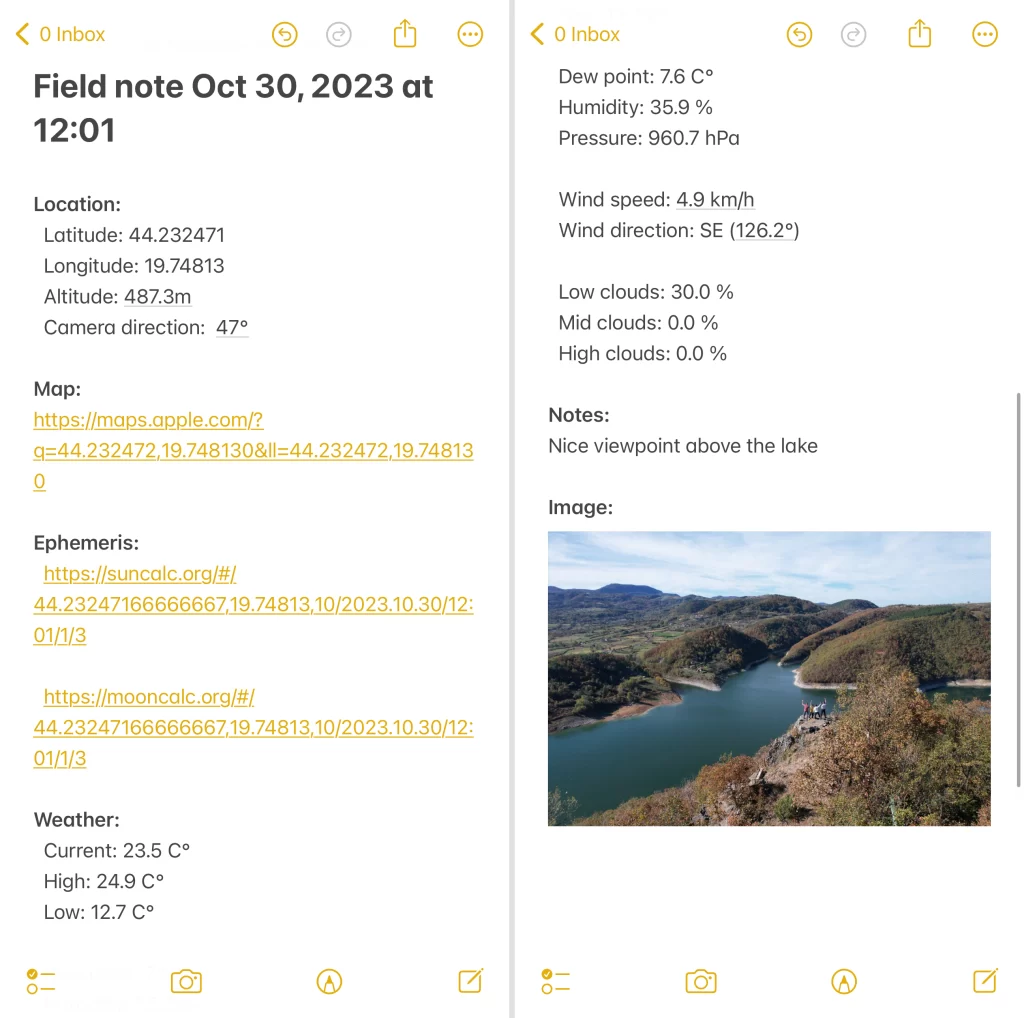
The result looks just like the result of a shortcut for extracting the data at the location as much as possible.
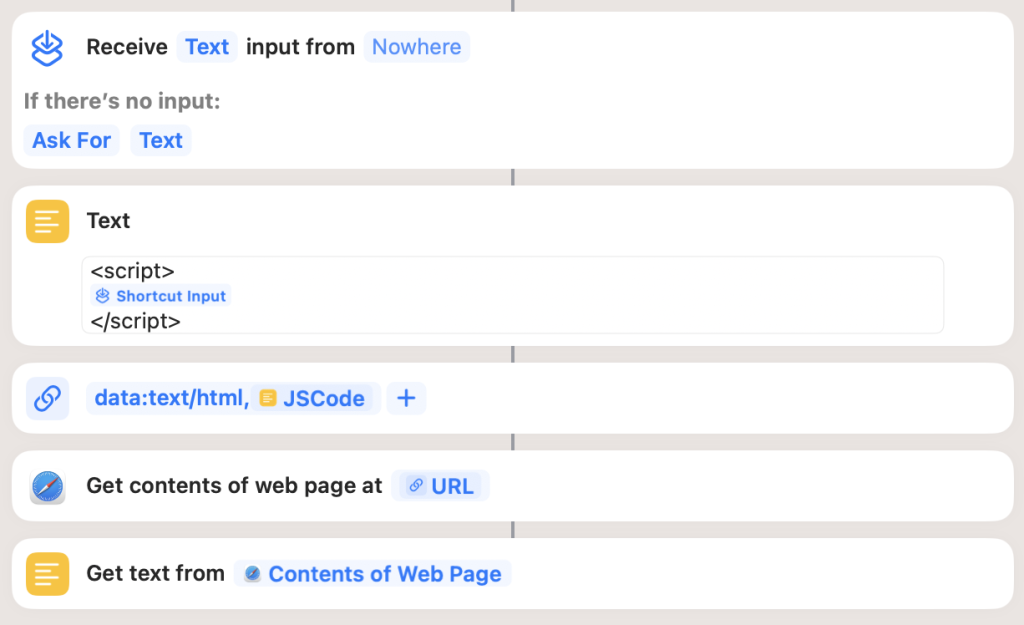
Utility Apple shortcut for executing JavaScript code
This utility shortcut receives JavaScript code as a text from the input of the shortcut, then executes that code through the “Get contents of the web page at” block and returns the result of JS code execution.
Utility Apple shortcut for reading Open-Meteo data
This utility shortcut will download Open-Meteo weather data for our location based on the longitude and latitude that we extracted from the photo. The bad part is that Open-Meteo can’t have weather data for each minute, so we need to calculate our weather data between two recordings using linear interpolation. This method is not very precise but allows us to have data instead of not having them at all.
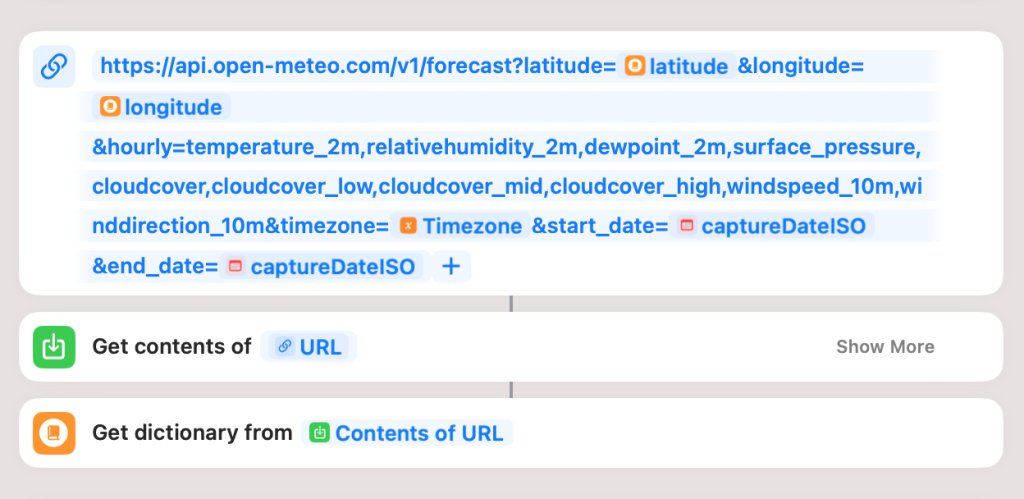
The first block of this shortcut downloads temperature, relative humidity, dew point, pressure, cloud cover, wind speed, and wind direction in JSON format from the Open-Meteo website. These parameters of the URL block are defined based on https://open-meteo.com/en/docs, so If you want to add weather variables or remove some of them this is the first place for that.
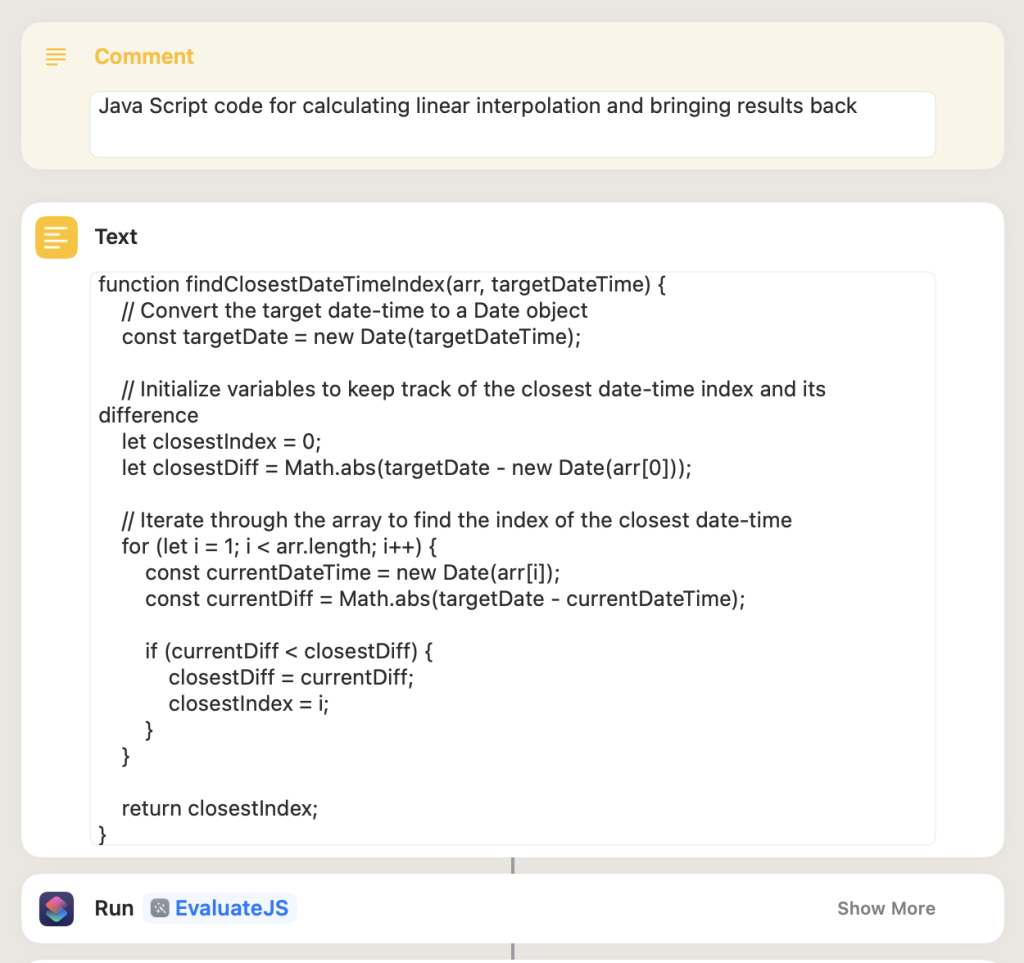
For processing tasks, I need JavaScript code. Unfortunately, this part can’t be implemented using Shortcuts simpler and faster than JS would execute. These two functions are findClosestDateTimeIndex and lerpData. Function findClosestDateTimeIndex is a JavaScript function that will for a list of date-time points for whom OpenMeteo has data try to find the position of the date-time point that’s the closest to the date-time point when we captured our image. As a result, this function will return the position of that time point.
The second function, lerpData is used for linear interpolation between two date-time points. It has three arguments dataArray, timeArray, and timePoint. dataArray is an array of weather data that we want to interpolate, timeArray contains values when weather data is captured and the timePoint represents the time when we captured our photo.
In the end, this utility script will return weather data as a JSON object, that can dictionary from Apple Shortcuts read and use for our main shortcut.
Where to go from here
In order to make location scouting notes more valuable there are some things we can store inside which are not described here. We can store info about the gear that can be used for capturing photos, as a separate section inside the note, then the location of a parking spot, and information about the ticket that needs to be paid before reaching our location.
Notion application, as a second brain tool, is a good place for storing captured data with one flaw. Notion does not have any integration with the Apple Shortcuts app, but with Notion API https://developers.notion.com this problem can be easily solved.
PhotoPills and Google Earth use KML files. KML is a simple text file in XML format that can be easily created using Apple Shortcuts. With a KML file in our “pocket”, we can easily import data into PhotoPills for further idea research and backup.
OpenMeteo weather data can’t be as precise as our data on location, in order to fix that problem we could use pocket weather meters like Kestrel Instruments 5500 or a similar one. These tools record in CSV file format multiple data like temperature, dew point, pressure, crosswind, tailwind, wind speed, wind direction, wind chill, and many others. This data can be easily combined with the date and time of the captured image inside Apple Notes.
Summary
Location scouting using Apple Shortcuts can be a very helpful and useful method of capturing data at the location or extracting data from photos taken with mobile phones at home. With captured data inside Apple Notes, we can prepare better for the next visit and capture some epic photos. Using Apple Notes on the other side we can load this data on a computer and prepare them for tools like Google Earth, Notion, or even Photo Pills.


Leave a reply